Comparing flat embroidery to 3D puff embroidery, we will notice key differences in texture and appearance. Flat embroidery lies seamlessly against the fabric, clearly displaying intricate details. In contrast, 3D puff embroidery creates a raised, puffy effect that adds boldness to your patch design. This dimensionality is perfect for logos or graphics that need to stand out. Understanding these distinct features can help you make the right choice for your projects, and there’s more to explore on this topic.
3D Puff Embroidery Vs. Regular Embroidery
When comparing d puff embroidery to regular embroidery, you’ll notice significant differences in texture and appearance.
3D puff embroidery patches offer a raised, three-dimensional effect that flat embroidery can’t match.
Additionally, while 3D puff direct embroidery provides seamless integration into the fabric, 3D puff patches allow for easier application and removal, making them versatile for various uses.
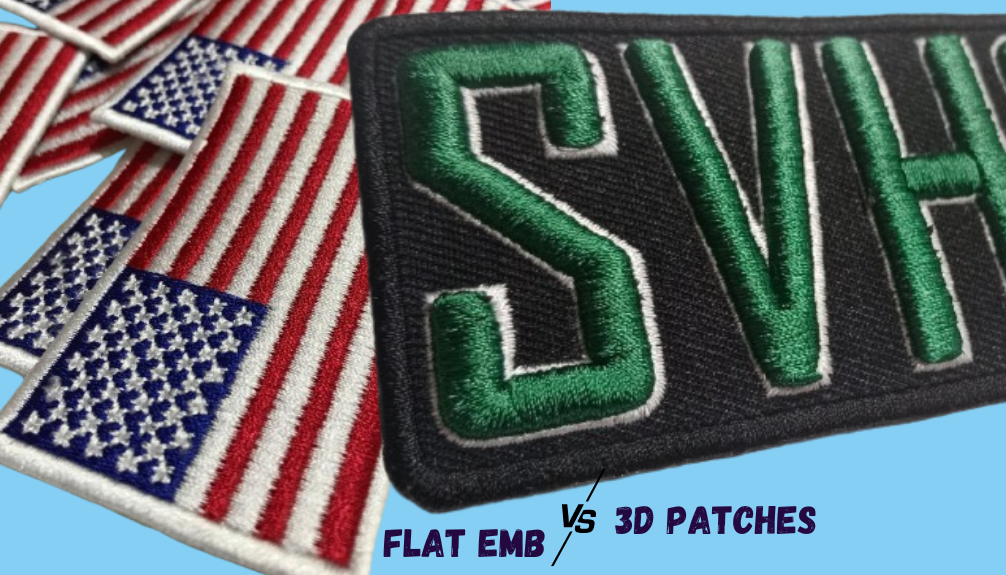
Surface Vs. Raised EMB Technique
While both flat embroidery patches and 3D puff embroidery patches enhance fabric with intricate designs, they differ greatly in appearance and texture.
Flat embroidery patches lie flat against the fabric, showcasing detailed designs with precision and a smooth finish. This makes them ideal for intricate logos or text that require clarity.
In contrast, 3D puff embroidery patches utilize a foam base, creating a raised effect that adds depth and dimension. This technique is particularly effective for bold designs, as it draws attention and creates a tactile experience.
Ultimately, your choice between flat and 3D puff embroidery patches depends on the desired visual impact and the nature of the design you want to showcase.
Direct Embroidery Vs. 3D Patches
While we are on topic and trying to determine the difference between puffy and flat-run embroidery, it’s a good time to make a quick distinction between direct-to-garment embroidery and embroidery as patches.
You do not always have to put 3D-raised text/fonts on your hats as patches. You can also get your garment embroidered and ask the embroidery artist to run over your favorite designs directly onto it.
D puff embroidery for hats offers a unique aesthetic that elevates your headwear game. This technique involves raising the fabric during the embroidery process, creating a three-dimensional effect that captures attention.
With 3d puff embroidery hats, you can showcase bold, intricate designs that stand out from the standard flat embroidery options. The puffed threads provide depth, making logos and graphics visually striking.
When selecting 3d puff embroidery designs, consider how they complement the hat’s style and structure. The material and thickness of the puff can vary, impacting the overall look.
Proper digitization is essential to guarantee that the design stitches out correctly, maintaining the desired elevation and detail. Ultimately, 3d puff embroidery transforms hats into standout fashion statements.
3D Puff Embroidery on Shirts
How can d puff embroidery enhance your shirts? Incorporating 3d puff embroidery on shirts adds a unique, textured dimension that flat embroidery can’t achieve.
The raised design not only catches the eye but also provides a tactile experience, making your shirts stand out in a crowd.
Here are some benefits of using 3d puff embroidery:
Creates a bold and striking visual effect
Offers a soft, plush feel that’s comfortable against the skin
Enhances brand visibility with dynamic logos
Allows for intricate designs that maintain clarity
Increases durability, resisting wear and tear over time
With the right techniques and materials, you’re well on your way to mastering 3D puff embroidery, which will transform your shirts into eye-catching garments.
3D Puff Embroidery Digitizing
Mastering the digitizing process for 3D puff embroidery is essential for achieving eye-catching designs. It’s a worthwhile investment for any embroidery project.
Being in California, you won’t have to go anywhere else for 3D digitizing. Patches Mania offers great quality embroidery digitizing for 3D logos. You can contact our team for free advice and technical support during business hours.
How To Do 3D Embroidery
Creating 3D puff embroidery involves several key steps that guarantee your designs come out crisp and striking. It begins with using soft rubber foam. By layering the foam beneath the fabric, you can achieve depth and dimension that flat embroidery can’t match. This method works exceptionally well for logos and intricate designs, making them pop. Here is a quick procedure!
First, you’ll need to select the right materials, including high-quality foam and thread. For effective 3D puff embroidery digitizing, particularly in California, it’s essential to use specialized software that can handle the puff effect.
You should then design your artwork, making sure it’s compatible with puff techniques. Once digitized, carefully hoop your fabric, placing the foam underneath the design.
After that, start stitching, allowing the foam to expand and create volume. Regularly check your progress to verify everything is aligned.
Finally, trim any excess foam for a clean finish, ensuring your design pops.
When Should You Need a 3D Digitizing Service?
You will need it for apparel and promotional items. It’s perfect for branding, as it elevates your apparel and gives it a professional look. Plus, 3D puff embroidery is durable, ensuring your designs maintain their appeal even after repeated washes.
What Is the Best Font Using For 3D Puff Embroidery?
Choosing the right font for 3D puff embroidery can considerably enhance the visual impact of your design.
You’ll want to select fonts that can accommodate the texture and height of the puff. Here are some tips on 3D puff embroidery fonts:
Bold Styles: Opt for thicker, bold fonts that stand out.
Sans Serif: Simple, clean lines guarantee clarity and impact.
Limited Details: Avoid overly intricate designs that can lose definition.
Rounded Edges: Fonts with rounded edges work well with a puff for a softer look.
Legibility: Choose fonts that remain readable from a distance.
What Is the Smallest 3D Puff Hat Possible?
Although smaller designs in 3D puff hat embroidery can present challenges, they also offer unique opportunities for creativity and detail.
When you’re working on the smallest 3D puff hat embroidery, precision is key. Unlike regular embroidery, which lays flat, 3D puff embroidery requires careful consideration of the fabric’s thickness and the puff’s height.
You’ll want to choose high-quality foam to guarantee the design pops without losing detail. Additionally, select a needle and thread that can handle the intricacies of smaller designs.
Keep in mind that while 3D puff adds dimension, it can also obscure fine lines, making it vital to strike a balance between size and clarity.
Experimenting with these elements will help you achieve stunning results.
Tips for Successful 3D Puff Embroidery Projects
Successful 3D puff embroidery projects rely on careful planning and attention to detail.
First, choose the right fabric and backing; a sturdy base will better support the puff. Verify that your digitized design has sufficient underlay stitches to hold the foam in place.
When selecting foam thickness, balance aesthetics and functionality; too thick can distort the design. Test your design on a scrap piece before the final project to check for any adjustments.
Finally, maintain consistent tension while embroidering to avoid puckering.
With these tips, you’ll create stunning, three-dimensional designs that stand out and impress. Happy Puffy stitching!
I'm a writer and embroidery enthusiast who is passionate about quality craftsmanship. I feel spiritual to share and review custom made products with a wider audience. I love writing SEO stuff for targeted market.
https://www.patchesmania.com/wp-content/uploads/2025/02/flatvs3d.png5751006Majidhttp://patchesmania.com/wp-content/uploads/2022/07/Patch-Mania-logo-2.pngMajid2025-02-16 06:41:292025-05-31 06:32:40Flat Embroidery Vs 3d Puff Patches – Everything We Know
0replies
Leave a Reply
Want to join the discussion? Feel free to contribute!

Leave a Reply
Want to join the discussion?Feel free to contribute!