 Patches Mania
Comparing Stitching Styles in Custom Embroidered Patches
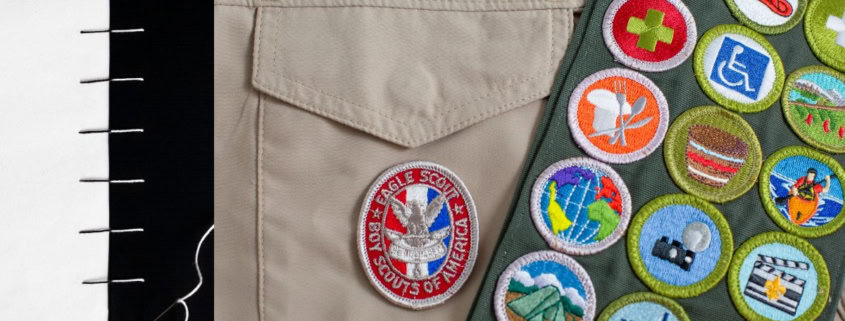
Embroidery and stitches are set to count side by side. Any logo that wants embroidery will ultimately end up with some stitch count. In a broader scope of custom-made embroidery, the second thing that comes to mind after direct embroidery vs Patches is stitch count.
Another thing that should be considered is stitching styles. It can significantly impact their overall look and functionality. It also matters in terms of pricing. You might be familiar with satin stitch for those smooth, refined edges or tackle twill for a more robust feel.
But what about the vibrant texture of the chain stitch or the solid finish of the fill stitch?
Each style offers unique benefits, and understanding these differences can enhance your choice. Curious about how these techniques can completely top up your embroidered patches? Well, There is much more to explore in custom embroidery patches.
4 Types of Stitching Style Comparison for Embroidery Patches
I will take up each stitching style for embroidery patches, including definition, use case, implementation, making, and benefits. Applying each stitch style to all these features is unnecessary, but I will cover whatever is implemented. Let’s begin
#1 Satin Stitch Style
Thinking of a polished look rather than showing fabric in parts of patches? That’s often the result of a satin stitch. This technique involves closely spaced, parallel stitches that create a sleek, shiny surface, perfect for adding depth to your patches.
Making
When you use a satin stitch, you fill in shapes with a series of tight stitches, allowing the fabric beneath to disappear. This method works wonders for lettering and intricate designs, giving them a professional finish.
Benefits
Sating stitched patches can lift up custom patches in a totally unique way. It makes embroidery patches stand out on jackets, biker vests, sweaters, and headwear like beanies and custom hats. Just remember to choose the right thread and fabric to ensure your satin stitch looks flawless and lasts long.
#2 Tackle Twill
Tackle twill is another style of stitching prominent to embroidered patches. This stitching style used customized shape cut twill for lettering and fonts.
Making
It offers any shape, set of alphabets, or custom design as base material layered upon one another or side by side. The already cut-off fabric (mostly polyester mixed twill) layers up and stitched down via zig zag or dotted styling.
Benefits
This can sewn onto almost any garment (mostly big designs) for an extremely finished look. Tackle twill stitch style is a great sewing technique for sorority organizations, such as Greek letters, sweatshirts, sports jerseys, lettermen/varsity jackets, etc.
Use
You will appreciate Tackling Twill for its versatility; it’s perfect for team logos, school emblems, or any design that demands attention.
#3 Chain Stitch
Chain stitch introduces a distinct texture and style to custom embroidery. This technique uses a series of interlocking loops, creating a decorative and dynamic appearance.
Use
Chain stitch is used for small-size embroidery logos. The use case is mainly suitable for direct to garment because if you want chain stitch as ‘Patches’ you must have to add satin stitch along for ease of cut off. Another chain stitch style use case is a filler for chenille patches. It actually fills up the empty part of inside chenille patches – usually left over in corners or complex artworks.
Benefits
If you want your design to stand out, chain stitch is a fantastic option that brings elegance and durability to your custom patches. With the chain stitch style of embroidery, you can customize embroidery designs to suit your specific needs. This versatility makes it popular for both casual and professional applications.
#4 Fill Stitch/Tatami
Fill stitch is another go-to technique for achieving a smooth and solid appearance for custom embroidered patches. This method involves densely stitching within a designated area, effectively filling it in with thread.
Use
The use case is quite simple for fill stitch style embroidery. Each and every part that the end user won’t want the fabric to show through will be completed with fill stitch or tatami stitching.
Note: The tatami stitch styles for big embroidery patches load up stitch counts, hence the pricing per stitch.
Benefit
You would love to see empty parts inside embroidery designs that should not surface baser fabric colour or the fabric itself. This versatile fill stitch allows for multiple sheds of threads all together for one purpose of final preview of the logo, clean finished and elite looking; isn’t it amazing
#5 Appliqué Technique
Applique stitching has various styles; it varies as per the applique technique used. Each technique brings strengths and visual appeal in the following;
Straight Stitch: This offers simplicity, and you can secure your appliqué pieces without complicating the process.
Zigzag Stitch: adds a layer of texture that enhances durability.
Satin Stitch: aims for a refined finish look on embroidery patches.
Blind Hem Stitch: presents a discreet solution if you prefer subtlety.
Decorative Stitch: allows you to embellish your appliqué pieces with intricate and eye-catching designs.
Stitching Styles for Border
For the border of embroidered patches, stitching styles include satin, merrowed, custom/die cut/cut to shape.
Custom stitch style, also called die cut or cut to shapes following design shape 100% as it is. Meanwhile, a satin stitched border means a densely embroidered border to lock the edge. Merrowed stitch border styles apply separate machines to overlock border edges. Read my blog, Merrowed Edge vs Others, for detailed information on this topic.